


Hey there, today we're about to explore ML pipelines for LLMs, have you ever wondered how this works behind the scenes make it all happen? Lets find out
Introduction
LLMs can understand and generate human-like text with remarkable accuracy, opening up a lot of applications like natural language processing, content generation, and question-answering systems.
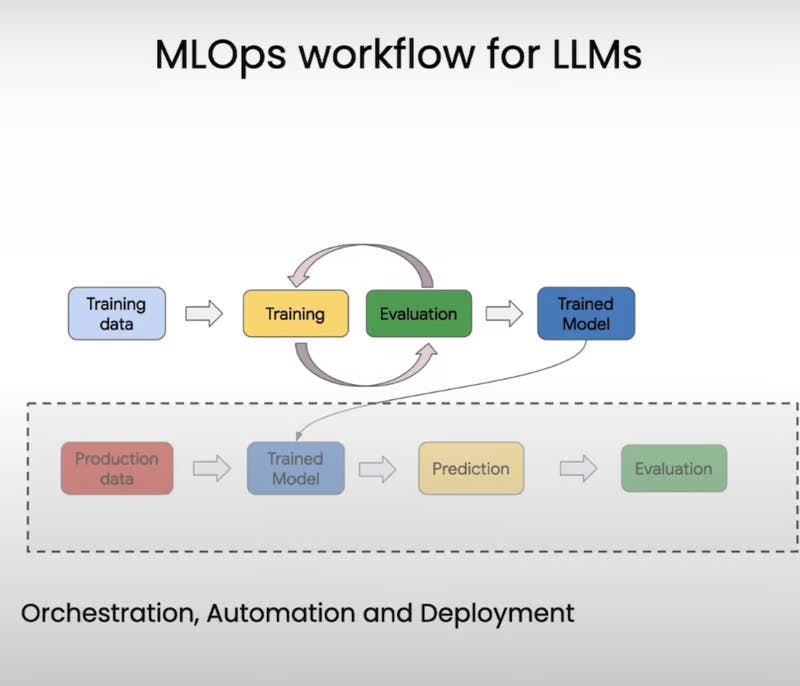
However, as amazing as LLMs are, developing and fine-tuning them for specific use cases is no walk in the park. It's a complex process that involves gathering and processing vast amounts of data, training and tuning the models, and continuously evaluating their performance. Just thinking about it is enough to give you a headache!
That's where machine learning pipelines come into play. These frameworks are used for automating and orchestrating the entire LLM development workflow.
Understanding Kubeflow Pipelines
Kubeflow Pipelines is an open-source framework that's like a construction kit for building machine learning pipelines. It makes it a breeze to orchestrate and automate those complex tasks involved in LLM development, allowing you to focus on the juicy bits – the actual model training and fine-tuning.
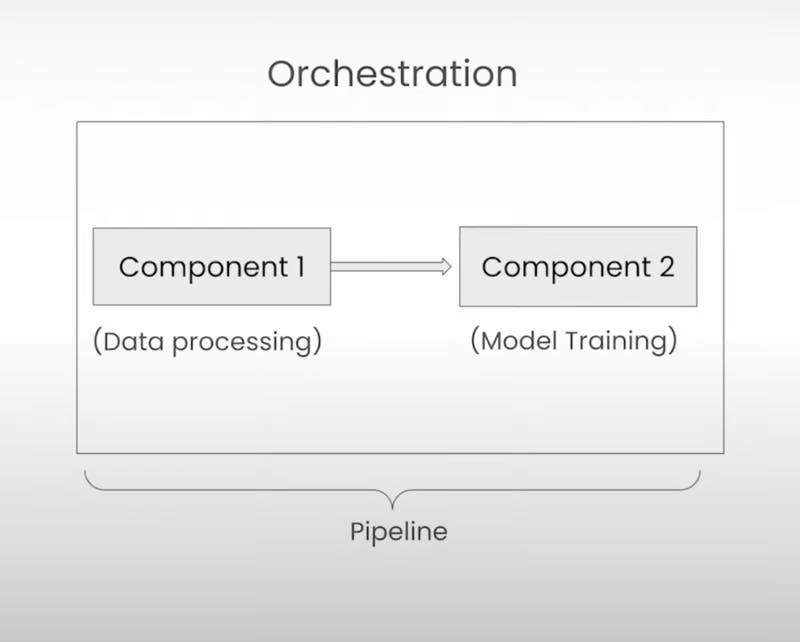
At its core, Kubeflow Pipelines revolves around two key concepts: components and pipelines. Think of components as self-contained sets of code that perform specific tasks in your workflow, like preprocessing data or training a model. They're like individual Lego pieces that you can snap together to create something amazing.
Now, pipelines are where the real magic happens. They're essentially a sequence of ordered components, each one passing its output to the next. With pipelines, you get to define the order of execution and how data flows from one step to another, ensuring your workflow runs like a well-oiled machine.
Building a Simple Hello World Pipeline
Alright, let's get our hands dirty and walk through a simple "Hello World" pipeline example. We are taking baby steps before tackling the big leagues, but trust me, it'll make everything click into place.
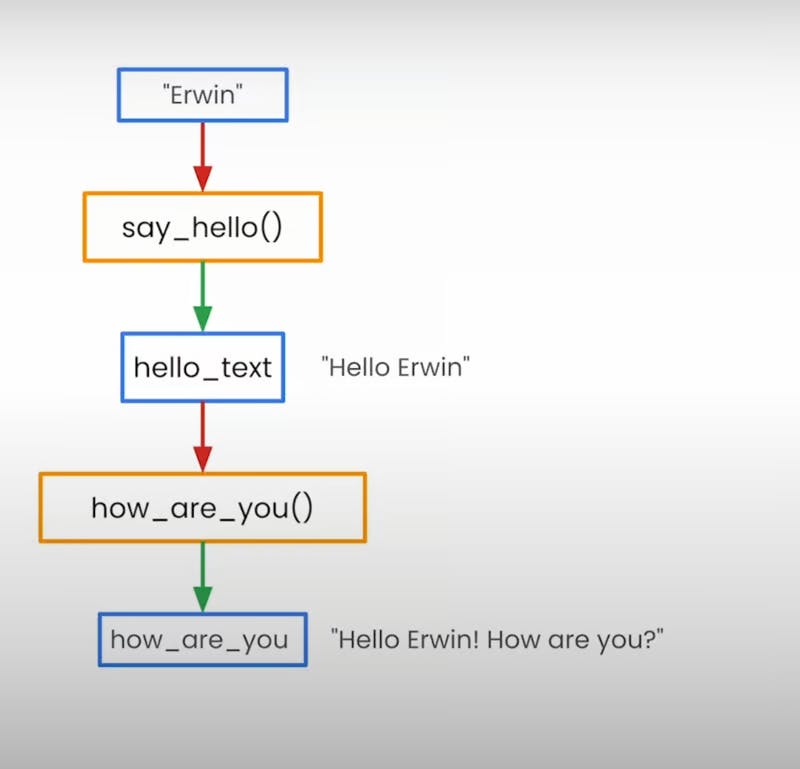
Imagine you have two Python functions: say_hello and how_are_you. The first one takes a name as input and returns a friendly greeting, while the second one takes the greeting as input and adds a follow-up question. Pretty straightforward, right?
@dsl.component
def say_hello(name: str) -> str:
    hello_text = f'Hello, {name}!'
    return hello_text

@dsl.component
def how_are_you(hello_text: str) -> str:
    how_are_you = f"{hello_text}. How are you?"
    return how_are_you
Now, here's where Kubeflow Pipelines comes into play. We're going to wrap these functions with the @dsl.component decorator, which tells the system, "Hey, these are components in our pipeline!" It's like giving them a special badge to wear.
Next, we'll define our pipeline using the @dsl.pipeline decorator. This is where we specify the order of execution and how data flows between components. In our case, we'll run say_hello first, passing its output (the greeting) to how_are_you, which will then add its own twist to the message.
@dsl.pipeline
def hello_pipeline(recipient: str) -> str:
    hello_task = say_hello(name=recipient)
    how_task = how_are_you(hello_text=hello_task.output)
    return how_task.output
Once we've defined our pipeline, we can compile it into a YAML file – a human-readable format that contains all the details about our components, their dependencies, and the order of execution. It's like a blueprint for our pipeline, ensuring everything runs smoothly.

compiler.Compiler().compile(hello_pipeline, 'pipeline.yaml')
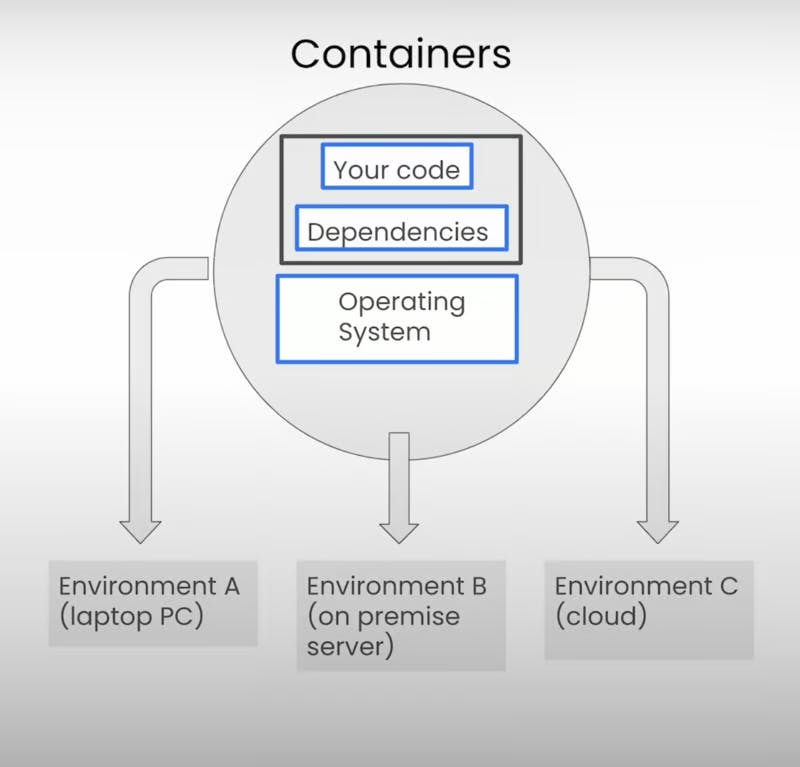
Now, here's the really cool part: we can execute this YAML file on different environments, like a managed service called Vertex AI Pipelines.
Imagine a scenario where you're building a chatbot for a customer service application. You could use this simple pipeline to generate friendly greetings and follow-up questions, setting the tone for a delightful conversational experience.
Real-life Example: Tuning a LLM
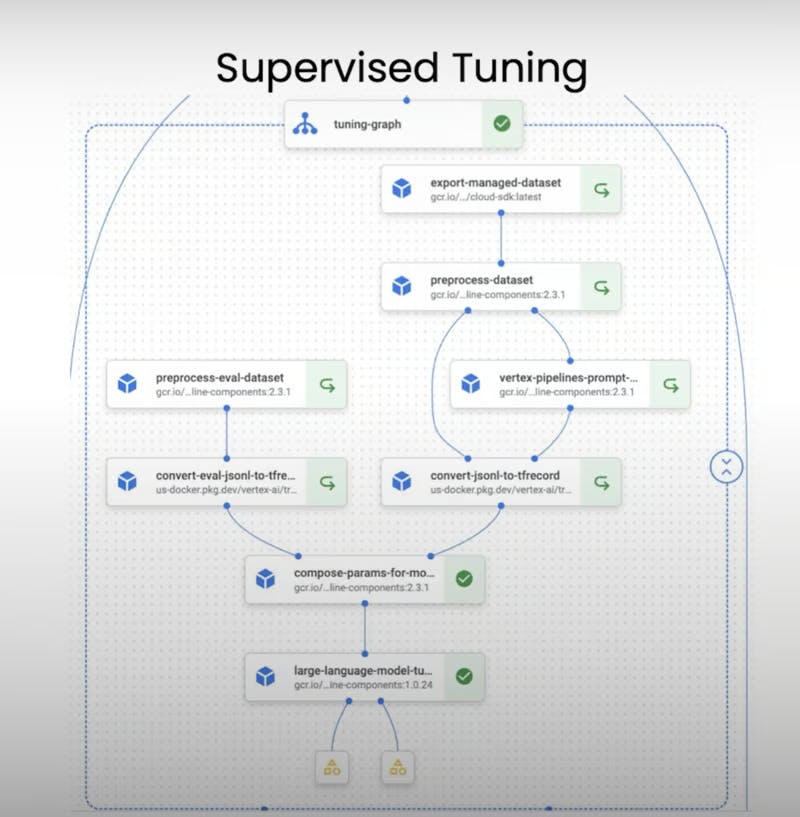
Alright, now that we've got the basics down, let's kick things up a notch and explore a real-life example of using Kubeflow Pipelines for tuning a large language model. In this case, we'll be fine-tuning Google's PaLM 2 model – a useful model for question-answering and language understanding.
One of the coolest things about Kubeflow Pipelines is the ability to reuse existing pipelines, which means we don't have to start from scratch. We can leverage the hard work of others and focus on customizing the pipeline to our specific needs.
So, let's dive in! First things first, we need to set up our pipeline by defining a few key parameters. We'll give our model a versioned name (because keeping track of our experiments is crucial), and we'll configure the training steps and evaluation interval. Think of these as knobs and dials that we can tweak to fine-tune our model's performance.
import datetime

date = datetime.datetime.now().strftime("%H:%d:%m:%Y")
MODEL_NAME = f"deep-learning-ai-model-{date}"

TRAINING_STEPS = 200
EVALUATION_INTERVAL = 20
Next up, we'll define the pipeline arguments – these are like the ingredients that our pipeline will use during execution. We'll specify things like the project ID, the region where we're running the job, the training data, and the evaluation data.
pipeline_arguments = {
    "model_display_name": MODEL_NAME,
    "location": "us-central1",
    "large_model_reference": "text-bison@001",
    "project": PROJECT_ID,
    "train_steps": TRAINING_STEPS,
    "dataset_uri": TRAINING_DATA_URI,
    "evaluation_interval": EVALUATION_INTERVAL,
    "evaluation_data_uri": EVAUATION_DATA_URI,
}
With everything set up, it's time to submit our job. Imagine it like a well-choreographed dance, with each component gracefully executing its task and passing the baton to the next. As the pipeline runs, we can monitor its progress, checking the status and reviewing the pipeline graph to see how our components are performing.
job = PipelineJob(
    template_path=template_path,
    display_name=f"deep_learning_ai_pipeline-{date}",
    parameter_values=pipeline_arguments,
    location=REGION,
    pipeline_root=pipeline_root,
    enable_caching=True,
)

job.submit()
print(job.state)
And the best part? Once we've tuned our model to perfection, we can easily integrate it into our production environment, whether it's a REST API or a batch process. It's ready to solve real-world problems and make a meaningful impact.
Key Advantages of Using Machine Learning Pipelines
1. Orchestration and Automation
With machine learning pipelines, you can say goodbye to those manual, error-prone processes. Pipelines automate and orchestrate the entire workflow, ensuring each step runs seamlessly and in the correct order.
2. Reproducibility and Versioning
Remember when I mentioned the importance of versioning our models? Well, pipelines take that concept to the next level by allowing you to version and reproduce your entire workflow. Want to go back in time and see how a particular experiment was set up? No problem! Pipelines have got your back.
Imagine you've been working on a project for months, fine-tuning your language model to perfection. Suddenly, you realize that one of the recent tweaks you made caused a slight dip in performance. With machine learning pipelines, you can easily revert to a previous version of your workflow, inspect the configurations, and figure out what went wrong. ensuring that your hard work is never lost in process of experimental iterations.
# List all pipeline runs
pipelines = client.list_pipeline_runs()

# Get a specific pipeline run
pipeline = client.get_pipeline_run(pipeline_id)

# Inspect pipeline parameters
print(pipeline.parameters)
Not only does this save you precious time and headaches, but it also promotes reproducibility – a crucial aspect of scientific research and development. With pipelines, you can share your workflows with colleagues or collaborators, allowing them to replicate your experiments and build upon your work, you're handing over your documented and versioned workflows.
3. Scalability and Efficiency
Pipelines are designed to be scalable and efficient, which means they can handle large amounts of data and complex computations without breaking a sweat, ensuring your workflows run smoothly and efficiently, no matter how demanding the task.
Imagine you're working on a language model that needs to be trained on billions of text samples. With traditional methods, you'd likely run into bottlenecks, delays, and resource constraints. But with machine learning pipelines, you can use distributed computing and parallel processing, allowing you to crunch through massive datasets in record time.
# Distribute pipeline execution across multiple nodes
@dsl.pipeline(name='distributed-pipeline')
def distributed_pipeline(input_data):
    preprocess = preprocess_op(input_data).set_parallelism(10)
    train = train_op(preprocess.output).set_parallelism(20)
    evaluate = evaluate_op(train.output).set_parallelism(5)
Not only does this save you time and resources, but it also opens up new possibilities for tackling even more complex and data-intensive problems.
Conclusion
Phew, we've covered a lot of ground, haven't we? From understanding the basics of Kubeflow Pipelines to exploring real-life examples and diving into the key advantages, it's been quite a journey. By automating and orchestrating complex workflows, ML pipelines free up valuable time and resources, allowing you to focus on what really matters.